A Baby Elephant

Congratulations

This card represented my mood over my three-day weekend.  It was full of happy moments followed by unexpected sadness.  News of a friend’s new baby on the way followed by the passing of a great man.

The baby elephant is the sign of good luck (so I’ve been told) for me it’s knowing that a friend has been blessed with new beginnings and a growing family.  The grass is the greener pastures that we are all bound to have with a positive attitude.

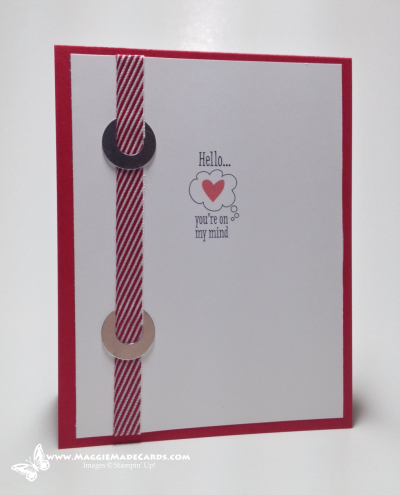
Yet, the half circle in the background represents the sun and the moon.  The transition of a life that was taken way too soon.   The moon is the passing on to another life with a departure of an awesome soul.  We are truly going to miss you Tim.  I promise to keep an eye on the Farmer’s wife.

Congratulations

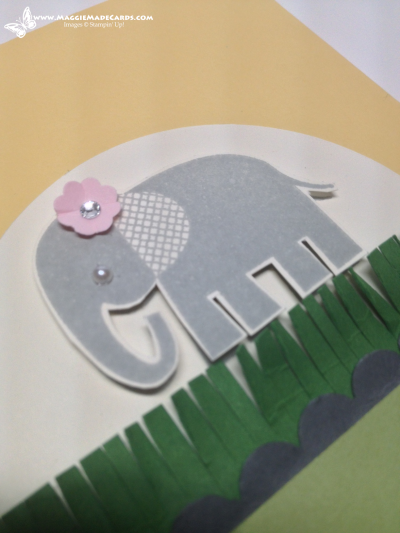
Here’s a close up of the tiny baby elephant with a pink flower on its head.  We don’t know what the sex of the baby is but you instantly know what we are hoping for.  Yes, we will be prayerful for a healthy baby period… but there is nothing but boys in this family, so a baby girl, is slightly hoped for. =)

DemoHeader_PastKits_Demo_Feb18_NA

Only while supplies last, active Paper Pumpkin subscribers can purchase a selection of past Paper Pumpkin Kits and Paper Pumpkin Refill Kits.

  • This special offer is available to any active Paper Pumpkin subscribers.  Former Paper Pumpkin subscribers are not eligible unless they resubscribe.
    • An active or current subscriber is someone who is receiving one or more Paper Pumpkin Kits on a monthly basis.
    • If a subscriber decides to skip a month, they are still considered an active subscriber.
  • Kits and refill kits will count toward Sale-A-Bration rewards (through March 31) and hostess benefits for all subscribers.
  • Active subscribers can order as many kits and refill kits as they’d like; however, this offer is good only while supplies last.  Once our current inventory of a kit is depleted, the kit will not be available for ordering.
  • There is no guarantee that we will sell additional past kits or kit refills again.
  • Kit prices do not include shipping; standard shipping rates apply.
  • To order these kits,  contact me today at maggie@maggiemadecards.com.
  • Kits cannot be ordered in the Online Store or via OEX (Online Ordering Express).
  • Paper Pumpkin Refill Kits do NOT include the stamp set or ink from the original kit.

Paper Pumpkin Passion

Paper Pumpkin Passion

Full Kits – $16.95 + shipping

Paper Pumpkin Passion

Refill Kits (refill kits do not include stamp set or ink):

Seriously Refill Kit (April 2013) $7.95
Hello to You Refill Kit (June 2013) $7.95
Party Pennants Refill Kit (July 2013) $5.95
Pedal Praise Refill Kit (August 2013) $7.95
Wahoo! Refill Kit (September 2013) $7.95
Noel Refill Kit (November 2013) $7.95

If you dropped your subscription and you want to re-subscribe to get these past kits, you will also receive the FREE set of In Color Stampin’ Write Markers (if they sign up by March 31).

To sign up click HERE!
To order these past kits… email me pronto! (maggie@maggiemadecards.com)

Blog Signature

Love You More

Love

Last week my hobby saved my sanity… LOL.  I seriously can’t remember the last time one week felt like an eternity.  Thank goodness the week ended with the day everyone wishes love upon each other.

I made this special card for my son who has saved every card I have ever given him.  When I first laid my eyes on this stamp set I knew I had to have it for just this one stamp.

When my son says to me, “I love you mom”, I always respond with, “I love you more.”  I will keep this stamp set forever because these words are used in my household all the time.

It is the best argument in the world to have with your loved ones.  So the next time someone tells you they love you…  respond with, “I love you more!”  But what’s better than that?  Show them by making them a card with those words.

Love

I used white emobssing powerder to make the image stand out on  Old Olive cardstock.  The added embellishments are no longer available… I’m so sorry, but that’s why you should receive a copy of the new catalogs on a yearly basis and the mini catalogs each time they come out.  Get yours today right here!

Blog Signature

Follow my blog with Bloglovin

Hello… You’re On My Mind

The blog hop was yesterday and if you missed it, don’t worry you’re not too far from it… just scroll down and you’ll catch up real fast… don’t forget to leave comments on the cards that are especially nice to you.

On My Mind

On to my card… I didn’t stray to far away from My Digital Studio <— click there and get your FREE 30-day free trial!  You can make all the cards with the FREE digital stamps, paper, cardstock that comes with the initial trial.

Play with it and don’t worry about breaking it… you won’t damage a thing.  If you need additional help the My Digital Class Finest Simplicity Kit – Digital Download is the perfect fit for beginners.

On to what I did to make my hybrid card… extremely simple and I put it together while watching tv in between commercials… sent it to my printer upstairs, which always has Whisper White cardstock in it and boom… there it is.


On My Mind

See the two washers?  I made them with two circle punches and they are made in the same similar way rings are made.  Only difference is the size of the circle punch or circle framelit.  View the PDF on how to make rings here.

For the ribbon, I took the Cherry Cobbler 3/4″ Chevron Ribbon, cut it in half and slid the rings into it and used Sticky Strip for adhesive.  It’s stronger and will prevent the ribbon from fraying.

To make the rings silver, I used the Silver Foil Sheets to give them the washer look.

On My Mind

The digital stamp set is from Love You To The Moon.  One of the easiest things about digital stamp sets is that you can fill them in different colors and they are just as pretty compared to ink pads.

Did You Know Starter Kits Also Come With

Starter Kit Digital

Starter Kit Digital

I offer you the gift of choice when you join my team.  You decide your membership (hobby for the discount or go for the gusto and have a side business part-time/full-time… honey you can have it all!  Read more here.

I would LOVE LOVE LOVE to design with you!

Blog Signature

Pals February Blog Hop: Things We Love About Stampin’ Up!

Feb Pals Blog Hop

Welcome to the Pals February Blog Hop.  This month we are excited to share with you what we love about Stampin’ Up! – our stamps, tools, accessories and techniques.

You may just be starting the blog hop or may have come from Donna Kopenski at  craftycardmaker, #15 on the Pals Hop.  If you get off track at any time, the full lineup below will help you move along from blog to blog so you see all of the amazing creations.

Hearts

If I wrote that I only had one favorite thing about Stampin’ Up! I would be a straight up liar!  I have so many and there is only room for one on this hop.

Right now my favorite tool is My Digital Studio and you can get it for a free 30-day trial!  It took me a little bit to get to know it better and there’s a secret that I’ll reveal at the end of my post so you too can feel comfortable using it… LOL.

Hearts

These sweet little hearts are from the Punch Shapes (118853) collection and the designer series paper is so easy to add, you will be amazed.  I used the Retro Fresh Designer Series Paper (Digital Download 136782).

To add the finishing touches simply add your favorite embellishments and watch the card come to life right before your very eyes.

I added Basic Rhinestones (119246), Gold Sequin Trim (132983), and a very small strip of Baked Brown Sugar 3/8″ Ruffle Stretch Trim (130022).

Hearts

The Thanks sentiment comes to you from the Thank You Kindly Stamp Brush Set – Digital Download (118826) and think about it… you can color it any color you choose without an ink pad!  Imagine that!

You can save the card and print it up in a jiffy next time you need one.  Current demonstrators not using MDS, your missing out.  Your customers will love your “thank you for your order cards” made from MDS!

My Digital Studio Secret Revealed

Practice, practice, practice.  It will make perfect… LOL.  You can also do what I did and score yourself the Finest Simplicity Kit – Digital Download (135912) and MDS your heart away!

The next stop is Natalie Bradley at Natalie Bradley Events, #17,  on the Pals Blog Hop!  Thanks for visiting and  I hope to see you next month.

Feb Blog Hop BACKFeb Blog Hop FORWARD

Blog Signature

Blog Hop Line-Up

  1. Kerry Willard Bray at  Peonies and Paper Chains
  2. Brian King at Stamp with Brian
  3. Janice Warhank at  Janice’s Papercraft Playground
  4. Shannon Hokanson at Paper Works
  5. Michelle Gleeson at  StampinMojo
  6. Marlene Heringer at So Many Toys So Little Time
  7. Linda Callahan at  Stampin’ Seasons
  8. Katy McGloin at  Just Fun Stamping 
  9. Susan Itell at  Simple Stampin
  10. Nicole Watt at  Pixel Maven’s Retreat
  11. Rae Harper-Burnet at  Wild West Paper Arts
  12. Sherrie Gross at  Stampin Sunshine
  13. Mary Fish at  Stampin’ Pretty
  14. Peggy Noe at  prettypapercards.com
  15. Donna Kopenski at  craftycardmaker
  16. Maggie Mata at  Maggie Made Cards <— YOU ARE HERE
  17. Natalie Bradley at Natalie Bradley Events
  18. Diane Roberts at  Score at Four and a Quarter
  19. Lisa Ann Bernard at  Queen B Creations
  20. Jackie Diediker at Stampin Jackie
  21. Alison Bilohlavek at ribbon and brad
  22. Kelly DeTommaso at  Kelly’s Creative Corner
  23. Martie Pollard at The Crafty Bandit
  24. Angie Blake at Angie’s Musings
  25. Dawn Tidd at  Tiddbits from Dawn
  26. Shirley Sumption at  Look at my Cute Stuff
  27. Debbie Mageed at Secret Stamper

Two of a Kind in Hybrid

MDS HybridMDS Hybrid

It’s fraternal two of a kind in hybrid using My Digital Studio (MDS)!  Two reasons why I used MDS to make these quick & easy cards.  1)  I do NOT feel intimidated by digital card making.  2) You can print from your home printer and add a couple of cute buttons (or ribbon) and turn it into a hybrid card.

I’m sure you can see the difference (real quick) in these two cards.  No, the angle the pictures were taken is not what I’m talking about… LOL.  I added a piece of Whisper White cardstock to the card on th right just to show you what you can do.

So, go on and get your groove on with a free trial of My Digital Studio.  Click here to get it now.  Those of you who signed up to receive the free template… it’s already  in your inbox.  You can still sign up here.

Products Used:  Crushed Curry cardstock, Subtles Candy Dots, and of course My Digital Studio.  Click here to get your free trial.

Pals Paper Arts #188

With this design I took advantage of Margaret Moody’s sketch challenge over at the Pals Paper Arts.

Don’t Forget Your Kid’s Valentine’s

[one-half-first]Valentine BoyClick here to buy these now.[/one-half-first][one-half]132163GClick here to buy these now.[/one-half]

Your kids will love giving these cute monsters away to their friends and classmates.  Buy them the cutest valentines around.  Only available for a limited time.  Comes with 18 boy or girl monsters (sold separately, 18 googly eyes, 18 adhesive hearts…. and they’re only $5.95!

Your children will love putting on the hearts and googly eyes. =)

Blog Signature

Birthday Card Fit for a King

Birthday Crown

This is a special birthday card made for my brother Reyes who was born on same day as The Epiphany.  It is a celebration I grew up with… not just celebrating my brother's birthday, but also the Three King's Day Celebration.

Sketch Challenge

When I saw card sketch at FMS 117 I knew I could turn the cute little banners around the sketch upside down and make a crown out of it.

Birthday Crown

To make the crown I used the Bitty Banners Framelits on a left over piece of Silver Foil Sheet and cut them in half.  I simply just glue them to the back of a small piece of Basic Black cardstock and used Smoky Slate as the card base. 

To make his name Reyes stand out, I embossed it with Silver Embossing Powder and the Happy Birthday sentiment from the Simply Sketched Hostess Stamp Set.

His name was written with the Designer Typist Polymer which is no longer in the Stampin' Up! inventory.  Which is why it's important to grab your favorite stamp set before they are sold out.

For an added touch of Royalty I attached Large and Basic Rhinestones to the crown to make his King status more fun.  

Birthday Crown

If you do not have a current active demonstrator you can get your Occasions 2014 Catalog from me here.  

Occasions Catty 2014

You can also click here to view the catalog.

Blog-Signature

Happy New Year Cards

This year I felt as if Christmas snuck up on me and I didn't make enough Christmas cards to send out.  I made two additional batches and still ran out of them!

I knew the Christmas cards wouldn't arrive in time, so I decided on Happy New Year cards.  I made them quick and easy and began mailing them out today.

Happy New Year3

Card one is clean and simple with whisper white on whisper white cardstock.  I used the Northern Flurry embossing folder on all three versions of my card to give it a soft & subtle texture.

NY2

With this one I changed up the card base with Island Indigo cardstock and added Island Indigo 3/4" Chevron ribbon.  

Happy New Year1

Finally, my third card with a card base color change using Bermuda Bay cardstock.  Maybe you too can make these if you missed a few people on your card list.  It took me 15 minutes to make 30 cards… yippee!!!

Don't pass up the opportunity to win FREE Stampin' Up! product from me here.

Is it too early to start thinking of Valentine's Day?

Valentine Day

Click Here to View

Blog-Signature

Christmas Cheer & Happy New Year

Christmas

This is my second set of mass produced Christmas cards and they were made during two lunch breaks.  That's how easy Stampin' Up! makes it with matching product.

The greatest thing about the matching product is they have all kinds of kits… see them here.

Christmas

ClearanceClearance

Clearance

Blog-Signature

Christmas
 

Congratulations on Your Wedding

Maggie's back in town!  WoW… what a whirlwind of even more travel since my arrival home.  It's been a whirlwind of international travel.  From Kyrgyzstan to California, Pennsylvania, and then Cancun, Mexico… I'm home until the next adventure.

Oh about my back… thank you so much for the well wishes.  I'm a whole lot better now… still a work in progress with continued physical therapy, but I'm 85% recovered.  Can't wait until I can start running again! =)

Wedding1

This beautiful wedding card was made for one of the two weddings I attended since returning from deployment.  Two very great friends were married and I was honored for being asked to witness the union of love.

This card captured that love too… don't you think?  I used the Top Note Stampin' Up! Bigz Die and made the buckle with Silver Glimmer Paper and two square punches.

You can make them too… punch the smaller square first then the larger one around it… you'll have a frame.  Simply cut out a small piece to glue in the middle and slip the ribbon in the middle.  It's that easy!

The heart was made using a small piece of left over Red Glimmer Paper with the Small Heart punch.

Wedding Congrats1

I'd love to end the year by sending a lucky reader the 'Epic Day This and That Designer Stickers' to include the 'This and That Epic Day Journal'.  Simply leave a comment and tell me what how you would use the journal.

The winner will be announced on Thursday, Dec. 19th's post.    
Blog-Signature

Wedding
More Supplies Used
Stamp Set(s):  Love & Laughter
Other:  Organza Ribbon

Christmas Messages with Joyful Tidings

Christmas

One of just a few clean & simple Christmas cards for some very lucky people.  I designed this card more than a month ago and I only made 20 of them.  All my Christmas will be quick and easy for you to recreate. 

As a matter of fact, they were all cut and stamped while I was deployed.  They were all ready to go and I carried them in my backpack because I thought I would stamp on my way home… on the plane.

Then a week before my homecoming, I hurt my lower back and was hardly able to move, much less enjoy some stamping while flying the friendly skies.

After reintegrating with family, friends, work, and starting my recovery with physical therapy… I put all 20 cards together.  They are now ready to be written in and put in the mail.

Christmas

There is so much going on in preparation for the new year… take a look at what already here now and get ready ahead of time…. click here now!

My questions to you today is… have you finished making your Christmas cards?  I can't wait to read your comments.

Blog-Signature

Christmas


Supplies
Stamp Set:  Christmas Messages 
Paper:  Bermuda Bay, Whisper White, Winter Frost Specialty
Inks/Color:  Island Indigo
Tools/Punches/Dies:  Deco Labels Collection Framelits

Fit for a Queen

I've been caught in a whirl wind of travel and visiting family & friends after returning from my deployment.  It took me a week just to reorganize my craft room.  I only had time to post one card over a week ago and I'm back for now.

At the beginning of the year I will begin a monthly shoebox card exchange using Stampin' Up! products for my local guys/gals.  Once that kicks off, I will offer free card classes for hostesses who want to earn free products.

For those of you who submitted a request for a free card kit… they will be the mail by this weekend.  I do apologize for the delay, but I underestimated how busy I would be.  Thank you so much for your patience.

Now let me tell you about this birthday card that I made for a sweet friend of many years.  This is one of those cards where the card itself has become a gift.  A quite quick & easy card to make with a clean & simple twist!


The crown is the reason why you need to look at the specials offered in the Clearance Rack, the Weekly Deals, or the Holiday Sale products.  I got the set of crowns from the Clearance Rack and they are no longer available.

What do you give that person that has everything?  A card kit that what!  Look at them here.

Blog-Signature

Crown3

Do you shop from the Clearance Rack?